Realme.govt.nz and Capital Surveillance

Posted by on Mar 04 2020

Realme is an NZ government project sponsored by the New Zealand government. While the initiative deserves credit, it has fallen short protections for complete privacy.

In short, Realme.govt.nz doesn’t track your online habits, but by using Google’s doubleclick and Google Fonts, it provides your online habits to Google and make you more track-able. This may look innocuous at first, especially since they openly state that they use analytics and it does not collect private information. This is the standard notice that Google provides all their clients, regardless if they are government or private business.

Why does this matter, after Realme is being transparent in there terms and conditions?

The problem is not that Realme isn’t transparent; it is that Google trackers are opaque. At best RealMe acting as a proxy for Google advertisers; at worst RealMe may lending its credentials to verify data for Google advertisers.

realme-5757960

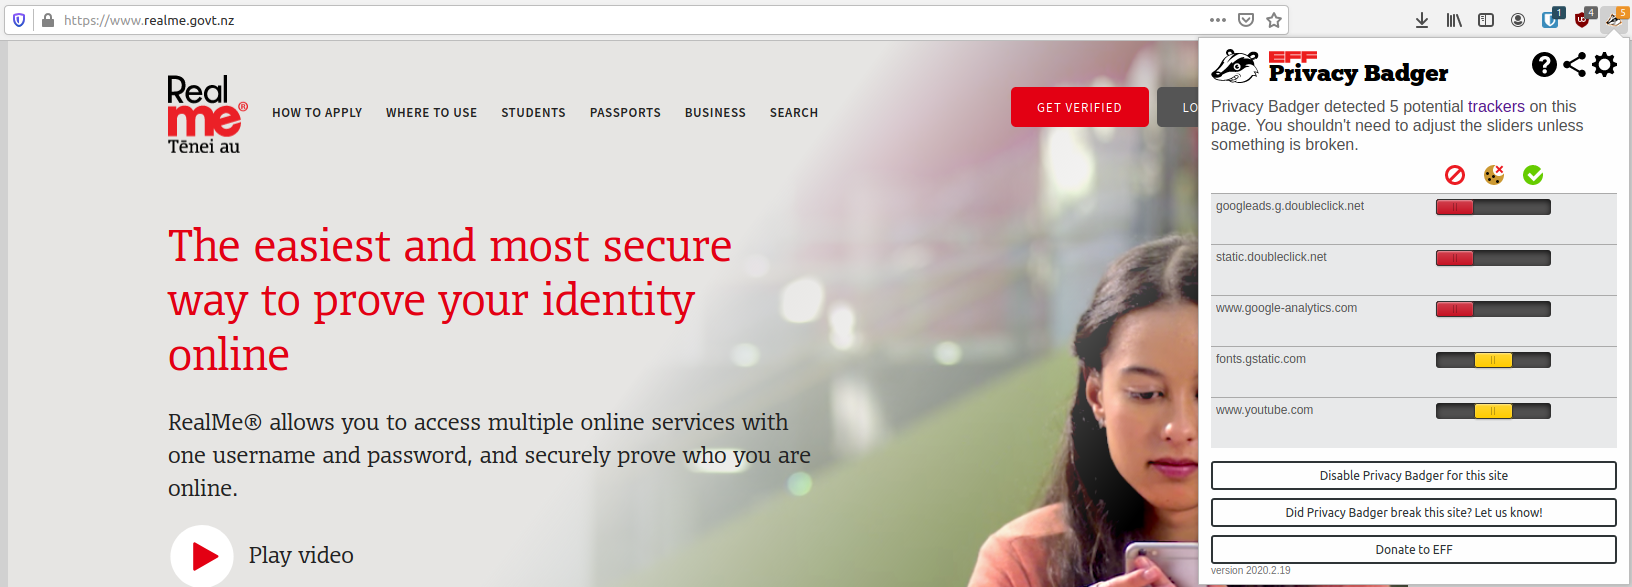
Let’s have a look at specifically how three of these trackers on RealMe websites works:

fonts.gstatic.com tracker

This is a popular font for ensuring consistent design. These fonts are hosting on Google’s remote server. Fonts are essential harmless themselves, however they can be used for what is known as dark patterns: a ploy used by an app or website to engage users in behaviours that they do wish to engage in.

How can simple web hosted fonts do this?

First of all, as soon as visitor loads the RealMe site which renders a Google font, numerous data can be collected such as, but not limited to IP, location, and device. This is no different than using a tracking pixel or javascript tracking. Any remotely embedded web object can be used for tracking.

Google specifically states in their terms and conditions:

YOU AGREE THAT GOOGLE MAY MONITOR USE OF THE APIS TO ENSURE QUALITY, IMPROVE GOOGLE PRODUCTS AND SERVICES, AND VERIFY YOUR COMPLIANCE WITH THE TERMS

What are Google products and services? Google makes 70% of their income from ad services. It would be naive to think that Google would not use fonts in conjunction with their advertising purposes.

static.Doubleclick.net tracker

This is Google’s advertising tracking. Doubleclick was the advertising company that Google purchased in 2007. This tracker watches your online behavour and use to align advertising to previous actions. For instance, if it sees you log to register for a passport, it can use this sell travel advertising.

There is no need to for this be on the RealMe website; it serves no purpose. Here is information on the static.doubleclick.net tracker may

  • the time and date you saw an advert.
  • the unique ID number the cookie has given your browser
  • unique ID of the advert
  • the ID of where the advert was seen on the site
  • what page you were on when you saw the advert
  • IP Address (which can guess your location)

Keep in mind none of this is in vacuum; your information is used in conjunction with all sites that have used the this advertising tracker to build a profile.

www.google-analytics. com

This is by an far the most ubiquitous tracker on the internet. As quoted in the research paper “Internet Jones and the Raiders of the Lost Trackers”:

Among trackers with the “most power to capture profiles of user behavior across many sites,” google-analytics.com is cited as a “remarkable outlier,” gathering more data from more sites than any other entity does.

Below is a screenshot from analytics account from there demo account. Note that nothing here is personally identifiable is packaged to the marketers who use this, however Google holds all the data which can be traced. This shows information that can be traced by IP address:

In Europe the user’s IP is to be anonymsied to further protect user’s identity:

The use of Google Analytics without the extension “anonymizeIP” constitutes a violation of data protection law and of the general right of personality. This was decided by the disctrict court („Landgericht“) Dresden in a remarkable judgement of January 11, 2019, which concerns the current data protection discussion on the use of web tracking technology (District court Dresden, judgement of January 1, 2019, reference number 1a O 1582/18).

It’s a very simple process to anonymous the IP in Google analytics, and currently RealMe.govt.nz does not do this, this is the tracking code from the RealMe website as 11 March 2020.


    (function(i,s,o,g,r,a,m){i['GoogleAnalyticsObject']=r;i[r]=i[r]||function(){
    (i[r].q=i[r].q||[]).push(arguments)},i[r].l=1*new Date();a=s.createElement(o),
    m=s.getElementsByTagName(o)[0];a.async=1;a.src=g;m.parentNode.insertBefore(a,m)
    })(window,document,'script','//www.google-analytics.com/analytics.js','ga');

    ga('create', 'UA-31182395-1', 'auto');
    ga('send', 'pageview');

To anonymous this it needs to add this line;

ga('set', 'anonymizeIP', true);

While is no New Zealand law that will hold RealMe accountable to anonymising IP addresses for this marketing tool, it should be this very site that should set a precedent for our privacy.

To make matters worse, by use of the previously mentioned dark patterns, the marketing site Nacho Analytics used Google analytics platform to display scraped user data: It is believed that Nacho Analytics collected browser extensions in conjunction with Google analytics to obtain very sensitive data*:

The issue with Nacho Analytics is that the tool showed third-parties all URLs users visited — and a subset of those URLs led to non-password-protected pages a regular user browsing the internet wouldn’t be able to find.

(Think: things like order confirmation pages, private PDF attachments, and other pages intended for that specific user’s eyes that sometimes aren’t protected by a login screen, but instead, are “blocked” by a set of “tokens” or a series of characters that would be difficult to guess.) Since Nacho Analytics captured and published these pages, users could go directly to the page and sometimes even view the information on it.

This breach exposed everything from flight itineraries, personal emails, and even tax records. While Google analytics itself was not directly responsible for the leak, it was the distribution system for which users could collect and disseminated the data.

What does it mean for the average New Zealander?

Google has essentially hit the jackpot for the tiny New Zealand demographic. More than half a million New Zealanders have a RealMe ID, Google now has a government verified demographic that it can used for advertisers. For a media company this is the gold standard, simply for the credibility that Realme has built up over the years.

Further, more Kiwis are savvier about being tracked, which renders Google analytics useless. The future of digital surveillance will unlikely come through 3rd party tracking tools, but built directly into browsers and apps. Also there is no need for Google fonts, as safe fonts for the web have long been established. In the case of RealMe, safety should be a precedent over design attributes.

One could easily use blockers (such as Privacy Badger in my screenshot) but why should New Zealanders have to be concerned on privacy based site like RealMe?

This does not a recommendation against Realme. If you use this service, you have to upload your personal information – the very act of monitoring this by a 3rd party, outside of NZ jurisdictions, should make one wary.

We can do better.

Read more:


* I used Nacho Analytics for a period of about 4 months. I was pretty shocked at the information I could obtain from a competitor’s site, and it left me scratching my head to how they did it. To Google’s credit they deactivated many Nacho Analytic accounts:

Asked if the arrangement violates any of Google’s terms of service, a company representative wrote: “Passing data that personally identifies an individual, such as email addresses or mobile numbers, through Google Analytics is prohibited by our terms of service, and we take action on any account found doing so intentionally.” The representative also said that Google has suspended multiple Google Analytics properties owned by Nacho Analytics for violating Google terms of service. Google employees continue to investigate additional accounts that may be connected or integrated with Nacho Analytics, the representative said, on condition the person not be named or quoted.

It is in the realm of possibility, though highly unlikely, that Realme.govt.nz was affected. I learned about Nacho Analytics during my stay in North America. If there was an issue, its likely that Realme.govt.nz’s Googles representative would have contacted them last year when this unfolded.

New Zealand teenagers: We know what you do, we know what you feel.

Posted by on Feb 17 2020

For those do not believe surveillance capitalism is a problem in our part of the world, listen to what Shoshanna Zuboff has to say.

Shoshana Zuboff..We know about a Facebook document that was leaked to the press in Australia written by Facebook executives to their Australian and New Zealand business customers. And what do they sell in this document?

They say we have so much detailed on behaviour and emotion from 6.4 million young teenage and young adult people who live in New Zealand and Australia. And through this intense depth and range of data, we know their emotional cycles through everyday and through the week.

Matt Frei: But is that actually true or that is that just a boast?

Shoshana Zuboff: Well it appears to be true. I mean, you know, someday we’ll get into Facebook and we’ll do the forensics and because well have the law to allow us to do that.

Right now, from everything we know and everything we triangulate, it appears to be true because it dovetails with the findings of researchers who have – academic researchers indeed who have been developing these very capabilities literally since the year 2008, 2009, 2010 were these kinds of data capture, data analysis translating into emotional behavioural insights that predict future behaviour.

We know that these capabilities exist and have been proven.

The full video is nearly 40 minutes an excellent primer surveillance capitalism. Below is the video – just beware that is hosted on youtube which is not a privacy focused product:

Understanding browser fingerprinting

Posted by on Feb 07 2020

  ClientVariations proto;
  for (const VariationIDEntry& entry : all_variation_ids_set) {
    switch (entry.second) {
      case GOOGLE_WEB_PROPERTIES_SIGNED_IN:
        if (is_signed_in)
          proto.add_variation_id(entry.first);
        break;
      case GOOGLE_WEB_PROPERTIES:
        proto.add_variation_id(entry.first);
        break;
      case GOOGLE_WEB_PROPERTIES_TRIGGER:
        proto.add_trigger_variation_id(entry.first);
        break;
      case ID_COLLECTION_COUNT:
        // This case included to get full enum coverage for switch, so that
        // new enums introduce compiler warnings. Nothing to do for this.
        break;
    }


The code above has been in the Google code base since 2014 and deployed across their Chrome browsers [1]. In total its just a few hundred lines of code (including comments) in a project that contains nearly 35,000,000,000 lines of code.

So what makes this special?

This code helps Google track you are no matter where you go on the internet. That bit of code, which represents less than one % of the entire Chrome project, may as well be a key factor in Google’s billion dollar advertising empire. This was recently highlighted in Github conversion where an Estonian developer questioned the validity of using this code:

kiwibrowser-6127227

This caused stir in the tech community, but made little news elsewhere. This is not something new, but something most people find too arcane to comprehend, and political leaders place in their ‘too hard basket’ to do anything about. This is easily understand.

This code is part of a user tracking process known as digital fingerprinting. Just like your own fingerprint, your digital finger print can uniquely identify you. This information is sought after by advertisers, hackers, and even governments. This type fingerprinting comes from a multitude of sources such as your IP address and browser.

Most people mistake that this ‘finger print’ is just an IP address, and indeed the VPN business has flourished the past few year. However an IP address is just of what they can track.

Besides the misplaced trust in VPNs, there is also some degree of misplaced trust in blocking Javascript on a site including analytics code and other trackers. However, these types of scripts are blocked by default by certain browsers such as Brave.

As of today, perhaps the most vulnerable component to your digital profile is your browser.

An overview of browser fingerprinting

Here is limited list of identifiers that your browsers signals to the website you visit.

  • User Agent – The user agent is a text record identifying the browser and operating system to the web server. These can vary quite a bit and can help your system be identified. Read more about here: https://www.howtogeek.com/114937/htg-explains-whats-a-browser-user-agent/
  • HTTP_ACCEPT – Returns a list of the type of content that is accepted in your browser such as text or html. Read more about this here: https://developer.mozilla.org/en-US/docs/Web/HTTP/Headers/Accept
  • Browser Plugins – Plugin has its name enabled, it will show here. Not all plugins have this.
  • Screen Size and Color Depth – This does what it says on the tin – this is very useful for identifying mobile devices.
  • System Fonts – The fonts on your system can also clearly mark who you are, graphic designers be aware!
  • Are Cookies Enabled? Have you enabled your cookies? Typically a yes/no answer.
  • Supercookie testing – A supercookie is a tracking cookie that telecoms can use to track your online behaviour. They can only be thwart by using the https and/or vpn use. Read more about it here: https://searchsecurity.techtarget.com/definition/supercookie
  • Canvas fingerprint – Canvas is modern HTML element that use for drawing graphics into your browser. These can be used to identify your computers graphic cards. Read more about it here: https://en.wikipedia.org/wiki/Canvas_fingerprinting
  • Web GL fingerprint – Web GL is a 3D is a javascript library for rendering graphics into your browser, it is usually enabled by the Canvas element mentioned above. Similar it can reveal the graphic capabilities of your device.
  • DNT Header: DNT stand for do not track, this is browser header that is widely ignore. Unfortunately, if you have it switched on or off, it also makes you more easily identifiable on the web. By default its not activated (set to null). Read more here: https://en.wikipedia.org/wiki/Do_Not_Track
  • Language – This the language of your browser. If you are multilingual or have different versions of a language (eg: En-US and En-GB), this will make you more unique and trackable.
  • Platform – This is the Operating system you are on (Linux, Windows, IOS, Android, BSD)
  • Touch Support – Identifies if you have touch screen and how its implemented.
  • Date and Time – This seems innocuous, but this can detect if you are using a VPN. For instance if your time zone in Auckland/Wellington and your IP is in Germany, its likely that your time zone gives you away.

There are many ways to check what information your browser sends out, some excellent online tools include browserspy.dkbrowserleaks.comdeviceinfo.me, and panopticlick by eff.

For the sake of ease, I have tested 4 different browsers on my laptop using the metrics Panopticlick tester. The results come from including the ubiquitous ChromeBrave, a chromium alternative; Firefox; and the Tor privacy browser. All these are fresh installs with no plugins installed.

The metrics are “bits of identifying information” – this breaks down browser elements into to component that can identify you. The less bits, the better. The second is “one in x browsers have this value”, here its better to have lower number as well, its better have many other browsers matching your profile. It’s best not be ‘one in million’ as that will make you stand out.

Finally – these may be very specific to your operating system or device. I’ve tested these on a freshly installed Ubuntu laptop, which not going to be as common as a Macbook or Windows Laptop. Please test for your own computer for best results.

Panopticlick “Bits of Identifying Information:”

Browser Characteristic Chrome Brave Firefox Tor
User Agent 13.21 7.89 6 2.62
HTTP_ACCEPT Headers 3.08 3.09 1.75 1.75
Browser Plugin Details 3.06 4.99 7.75 0.87
Time Zone 4.26 4.26 4.26 2.28
Screen Size and Color Depth 2.64 2.65 2.64 6.12
System Fonts 7.27 7.28 6.64 3.27
Are Cookies Enabled? 0.21 0.21 0.21 0.21
Limited supercookie test 0.33 0.32 0.33 0.33
Hash of canvas fingerprint 9.38 9.39 7.23 2.83
Hash of WebGL fingerprint 14.27 8.88 6.92 6.57
DNT Header Enabled? 1.1 1.1 1.1 1.1
Language 0.93 0.93 0.93 0.93
Platform 3 3 3 3
Touch Support 0.75 0.75 0.75 0.75
Totals 63.49 54.74 49.51 32.63

Here Tor browser clearly is the winner, with half of the identifying bits that Chrome shows. The only place where Tor loses out is on screen size and color depth. There is not too much distance between Chrome and Brave, and Firefox sits in the middle of the pack. The User Agent of Google Chrome almost double the information of next nearest browser.

Panopticlick “One in X Browsers Have This Value:”

Browser Characteristic Chrome Brave Firefox Tor
User Agent 9450.43 237.53 64.14 6.15
HTTP_ACCEPT Headers 8.46 8.49 3.37 3.37
Browser Plugin Details 8.34 31.84 214.78 1.83
Time Zone 19.21 19.22 19.21 4.84
Screen Size and Color Depth 6.25 6.26 6.25 69.5
System Fonts 154.05 154.95 99.7 9.65
Are Cookies Enabled? 1.16 1.16 1.16 1.16
Limited supercookie test 1.25 1.25 1.25 1.25
Hash of canvas fingerprint 666.75 671.31 150.52 7.11
Hash of WebGL fingerprint 19760 471.5 121.49 95.25
DNT Header Enabled? 2.14 2.14 2.14 2.14
Language 1.9 1.91 1.9 1.9
Platform 8.02 8.03 8.02 8.02
Touch Support 1.68 1.68 1.68 1.68
30089.64 1617.27 695.61 213.85

Here is where we seeing the nearly shocking amount of uniqueness that chrome exposes. In particular the User Agent, Fonts, and Web GL information. Brave, despite their inbuilt JavaScript tracking, also exposes more than double the information than Firefox and almost 8 time more than Tor. Firefox does well here, it’s only weakness is in the plugins. Tor is again well out in front of all tested browsers, with screen size and color depth being its only weak point.

Getting back to the controversy

Let’s get to controversy about the article – Google announced that they were going to simplify the user agent to make it less identifiable. This is great news, right? Well, the problem is that user’s point out where the following:

  1. There are still many other factors in the Chrome browser that identify you – if you reduce the unique browser factors in the test above to Tor’s values, you would still get extremely strong identifying factors from other browser features.
  2. Google’s very own X-Client data is not revealed directly to anyone but it’s own internal network. This layer of opacity has disturbed many in open source software community and privacy advocates.

Google’s response to this controversy was the following came from an from an unnamed spokesperson:

“The X-Client-Data header is used to help Chrome test new features before rolling them out to all users”

“The information included in this header reflects the variations, or new feature trials, in which an installation of Chrome is currently enrolled. This information helps us measure server-side metrics for large groups of installations; it is not used to identify or track individual users.”

There is much more to be said here. If you are not afraid of learning more, Stack Exchange is a a good resource, and if you are more technically inclined you can browse the source. Here is a summary taken from the chrome source code of all the different Google properties that x-client data is passed to:

  • android.com
  • doubleclick.com
  • doubleclick.net
  • googleadservices.com
  • googleapis.com
  • googlesyndication.com
  • googleusercontent.com
  • googlevideo.com
  • gstatic.com – This how google serves its static files such as JavaScript.
  • ggpht.com – This appears to be part of Google image serving network for Youtube and Blogger.
  • litepages.googlezip.net – this appears to be something to do with lite pages served by Google Chrome.
  • ytimg.com – this stands for Youtube Image.

Putting it all together

The question maybe asked ‘so what’? At the beginning of the movie “The Great Hack” a young woman poses the question:

Maybe it’s because I grew up with the Internet as a reality. The ads don’t bother me all that much. When does it turn sour?

From Cambridge Analytica to Google + Data Leaks, we’ve already seen numerous instances of big data scandals that have turned the world upside down. There isn’t any reason deny that privacy and more importantly, decision rights over our data, should be taken back by the consumers.

Ultimately browser fingerprinting is very difficult to overcome at this stage and time, but there are small things to do that can help.

Things you can do now:

Change your browser – do not use Google chrome. Here is a bit more about the options I tested:

  • Firefox – Out of the box, it is more private that chrome, and with additional plugins such as Ublock Origin can help against additional Javascript tracking.
  • Brave – This is a chromium based browser which by default blocks JavaScript tracker. It is more anonymous out of the box than Chrome.
  • Tor – Tor is a Firefox browser with anonymity in mind. Its not build for speed, but it is built for privacy. Tor recommends not to use any plugins and also, do not use a VPN.

I have not yet tested for other popular browsers such as SafariKiwi BrowserMicrosoft EdgeWaterfox, or Vivaldi.

Change your user agent: You can change the user agent and other settings for your browsers with the guides listed below. These require some tinkering and may void your ‘warranty’. While this may not make you any less unique, it might you more anonymous if you change it to common browsers agent strings.

Develop a personal browsing strategy. This requires some discipline for surfing the net. For example:

  • What browser do I use for work?
  • What browser do would I use for every day use?
  • When should I use the Tor browser?
  • What browser should I use for my Google (Facebook, LinkedIn etc) .

Ask the questions – if you unsure if your software or hardware is doing something that it shouldn’t, ask online, and you can always ask anonymously on places like reddit. There is is no harm in this, and you might be surprised you may not be the only person with your question.

Contact the privacy commissioner: Enquire about what data is being collected by out of country and what policies are in place to protect local businesses and as well individuals.

Further reading:

Footnotes


[1] The original lines of the Google code where pointed by user Ted Mielczarek on StackExchange: https://stackoverflow.com/questions/12183575/what-is-following-header-for-x-chrome-variations/13239916#13239916 . They are as follows:

[2] Personally Identifiable Information – this is key part of Europe’s General Data Protection Regulation (GDPR).

reCaptcha knows when you contact the IRD

Posted by on Feb 03 2020

Last December, I had to set up an account with BC Hydro in Canada, which is provincial government’s energy company. While going through the process of setting it up online – there was a reCAPTCHA message at the bottom. But unlike most, this one had some fine print:

Prior to using the following validation process offered by Google, please be aware that Google may collect information based on their data collection policies. Such data may include information like your IP address, browser type, OS version, and the fact that you are dealing with BC hydro. If you don’t want such information to be collected by Google do not use this online validation service and, instead call the 1 800 224 9376.

bc-hydro-8763204

Needless to day, this was a huge surprise. First of all, I didn’t even consider that the technology behind reCAPTCHA could do those things. Secondly, that an Government site would actually have the forthrightness to actually list this. I was pleased with the openess. For those who need more background on what Captcha and reCaptcha is.

Knowing very little about the reCAPTCHA process, I immediately decided to investigate – the ins and outs of Google’s bot detection device. The results were the following:

How do New Zealand governmental agencies fare? A very quick survey shows that the IRD, Elections website, and consumer protection all use reCaptcha without any warning of 3rd party data collection, nor any alternatives. This is not uniform across NZ government sites, for example, beehive website uses a mathematical captcha. See below:

recaptcha-ird-5875487

recaptcha-elections-4512951

recaptcha-consumerprotection-7127279

recaptcha-nzstory-6716427

simple-recatpcha-1721241

This certainly isn’t to point fingers and blame Government sites, in fact, if someone like me, who has worked in technology for years, was ignorant of this data collection, certainly it can be forgiven that they use this technology to help fight spam.

However these websites are gateways to New Zealand’s personal information and should not be taken lightly.

Ideally, if New Zealanders wants to see data protection from capital surveilliers, it should start with an unified example from the Government. If you are concerned contact the privacy commissioner.

Modern Perl – Getting Starman, Nginx, and Plack on your website with Ubuntu Server.

Posted by on Feb 02 2020

The goal of this guide is to get Perl working on live domain running with Plack.

This is a very basic set up on how to get Plack, Nginx, and Starman aligned if you want to set up a more modern web application in Perl. This means moving away from ye olde CGI.pm and mod_perl. If you see a better way of doing this, then don’t be silent, comment below!

Like many, I was a php developer for years, so getting LAMP stack going was easy. It also not too hard to use CGI and mod_perl, and if this works for you, then please use them. The Perl community can get a bit ornery about their use, and I think they are fine too. However, there is a modern way of doing things that most recommend which is PSGI.

PSGI is a protocol that many PERL frameworks use (Dancer, Mojolicious, Catalyst); however, I wanted to figure how to get it running without framework, because by doing things the hard way, I tend to learn things a lot deeper!

It sounds complicated, and it took weeks for me to set in and figure out. I also nearly crashed my server with trying to set things up. For reference, if my guide doesn’t help see if you can follow these tutorials – they got me on the path to success:

  • Why use Plack? If you need a deep read, check out the inventors slide deck: [http://slideshare.net/miyagawa/plack-at-oscon-2010][1]
  • This gives you a easy start into learning how to use Plack, our example here is just using hello world example. https://advent.plackperl.org/ (note if you like it, just donate $5 to get the epub)
  • You can follow this pretty closely and get your first web app working with Plack instead of Dancer: [https://stackoverflow.com/questions/12127566/an-explanation-of-the-nginx-starman-dancer-web-stack][2]
  • Here is the original tutorial I found for Dancer. They used perlbrew, which my system didn’t like. [https://perlmaven.com/getting-started-with-perl-dancer-on-digital-ocean][3]

In truth – after I saw how everything worked – it was a bit of an ‘Ah ha’ moment. Its not particularly complicated, just a new way of thinking.

Part One – Don’t use System Perl

The cool thing about Perl – its likely on your system already. This is how I got back into Perl, because it was already there. However, using your system Perl is probably not a good idea when you are doing active development. Before we install all the Plack goodies, it a good idea to get separate installation of Perl just for our web projects.

There are two Perl install managers that you can have a look at, PerlBrew and Plenv. The Dancer tutorial above used PerlBrew, but my installation was not happy with it, and suffered from constant failed installations, even when force flag was used. So I used Plenv – which worked like a charm. You can try PerlBrew if Plenv doesn’t work.

Note – before you get started, you probably want to set this up as a brand new user, and not root (for security reasons). I’ll leave this up to you, [here is how to create a new user][4]. Once you’ve done that here are steps to install plenv:

The detailed Plenv instructions are on [GitHub][5], here is shorter version for Ubuntu:

Setup plenv into your home directory ~/.plenv (eg /home/.plenv)

  1. Clone from Github
    $ git clone https://github.com/tokuhirom/plenv.git ~/.plenv
    
  2. Add ~/.plenv/bin to your $PATH for access to the plenv command-line utility.
       $ echo 'export PATH="$HOME/.plenv/bin:$PATH"' >> ~/.profile
    
  3. Add plenv to your shell to enable shims and autocompletion
    $ echo 'eval "$(plenv init -)"' >> ~/.profile
    
  4. Restart your shell as a login shell so the path changes take effect
    $ exec $SHELL -l
  1. Install perl-build, which provides an plenv install command that simplifies the process of installing new Perl versions.
    $ git clone https://github.com/tokuhirom/Perl-Build.git ~/.plenv/plugins/perl-build/
    
  2. Almost there – your plenv command should be working now so have look at all the fine versions of Perl it has to offer
    $ plenv install --list
    

A couple of quick tips on deciding. If you choose an odd numbered release its considered unstable You find an install fails, just try another. My system was finicky, but I eventually got there. The install is the longest process.

To install Perl choose a version number form the list and run. Below is the version i used:

$ plenv install 5.30.1

This is potentially a good time to take the dog for a walk! Finally when its done, or whenever you install a cpan module, you have to run this command:

$ plenv rehash

Of you can install this module and it will take care of it for you.

$ plenv install-cpanm

Now check out what versions of Perl you have installed by running “plenv versions” like this:

*system (set by /home/username/.perl-version)
5.30.1

You’ll see the the asterisk by the default system, so you can change this: Set your default developer Perl by

$ plenv local 5.30.1

by doing so you should see that it now goes to your new Perl, note asterisk

system (set by /home/username/.perl-version)
*5.30.1``

You are now ready to install Plack! Quick note – I sometimes noticed that my ‘plenv’ command is not recognised. I run step 5 ($ exec $SHELL -l) and it returns. This was the long part of the set up.

Part 2: Install Plack!

This is pretty easy:

$ cpanm Plack

This took a while to install as well. In addition, it runs a series of test, which some my fail and your install will fail. If that happens try doing a force install (it will explain it should it fail).

Part 3: Install Nginx

I actually made the decision to uninstall my Apache server. I have fond memories of Apache, but wanted a fresh break. If you want to remove [Apache follow this][6]:

$ sudo apt-get remove --auto-remove apache2

if you want to get rid of everything (including local config files)

$ sudo apt-get purge apache2

For installing Nginx here’s a great [blow by blow guide][7] which I’ve whittled down. Refer to the tutorial above for fine tuning.

    sudo apt install nginx #install nginx
    sudo ufw allow 'Nginx FULL' 

We’ll do some more configuration later on.

Part 4: Write your first Plack App

This will be super simple, write of of the Plack Advent Calendar. A simple Hello world. Go to any directory on your server where you will keep your code. Note – you don’t have to keep this in the web document root, in fact, its better if you didn’t (think about the way good old CGI works).

Create this code and save it as hello.psgi (for reference I saved it in /home/perlapps/hello.psgi)

my $app = sub {
    return [ 200, [ 'Content-Type' => 'text/plain' ], [ 'Hello, is it me you're looking for?' ] ];
};

now see it in action:

    ? plackup hello.psgi
    HTTP::Server::PSGI: Accepting connections at http://0:5000/

If you are on your local server go to 127.0.0.1:5000, if your remote server go to :5000 and you should see your message:

**‘Hello, is it me you’re looking for?’**

That’s your first Perl plack script app. But as you can see its not tied to your domain. That’s what where are going to get to!

Part 6: Starman & Nginx

This is the final part. We want Starman to serve our dynamic psgi script and Nginx to serve any static content (think css and images).

Lets do Starman first:

sudo plackup -s Starman -p 5001 -E deployment --workers=10 -a /home/perlapps/hello.psgi

Notice the path to the psgi file we just created above. Next we will configure our website.conf file for nginx. Note if you need to know how to set up set sites in nginx, follow this [tutorial on digital ocean][8]. Here is a mock configuration which sets everthing up:

server {
listen 80;
listen [::]:80;


  root /var/www/gurdyhurdyman.org/html;<br />
  index index.html index.htm index.nginx-debian.html;

  server_name gurdyhurdyman.org www.gurdyhurdyman.org;

  location /css/ {
    alias /var/www/gurdyhurdyman.org/html/files/css/;
    expires 30d;
    access_log off;<br />
  }

  location / {
   proxy_pass        http://localhost:5001;
   proxy_set_header  X-Real-IP  $remote_addr;
   try_files $uri $uri/ =404;<br />
  }

  }

The “location /” bits are the magic parts: nginx will serve all the css files through port 80, while starman gets served via proxy at port 5001.

If you visit your domain (note that gurdyhurdyman.org does not exist), you should see your .psgi file shining through some lyrics from Lionel Richie 🙂